Jellycat Birthday Cake with Strawberry Jam Filling
Highlighted under: Home Bakery Recipes
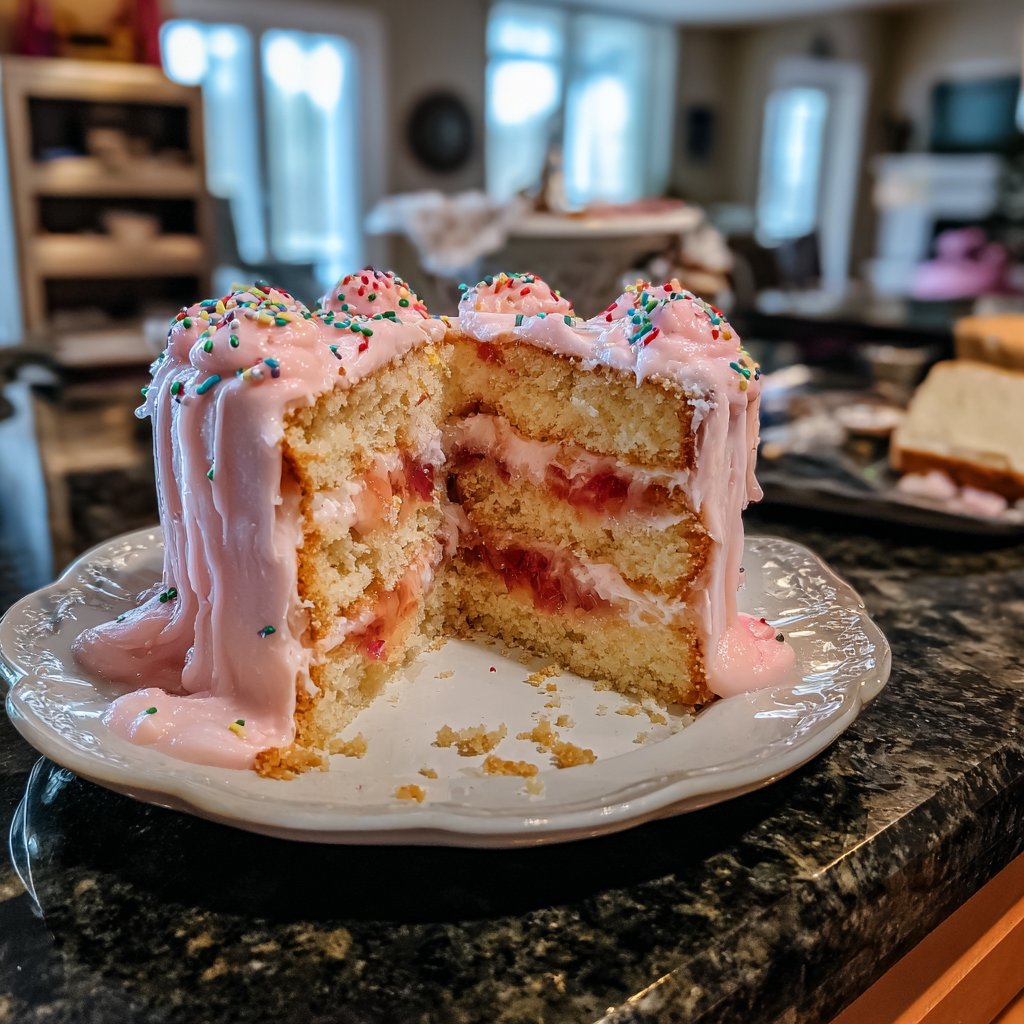
When I decided to make the Jellycat Birthday Cake for my friend's special day, I knew I had to showcase a delightful balance of flavors. The subtle sweetness of strawberry jam perfectly complements the lightness of the cake, creating a treat that's not only visually appealing but also a crowd-pleaser. As I layered the cake, the vibrant colors reminded me of childhood celebrations, making it hard to resist snagging a slice even before the candles were lit. This cake is a true show-stopper that will leave everyone asking for the recipe!
During the process of making the Jellycat Birthday Cake, I experimented with various flavors to find the right balance. The magic happened when I paired the light vanilla sponge with a rich strawberry jam. This combination not only brought back memories of childhood parties but also made for a refreshing flavor combination that is loved by both kids and adults. To ensure the cake stayed moist, I brushed the layers with strawberry syrup before stacking them.
One tip I learned was to let the cake layers cool completely before frosting; this prevents the icing from melting and creating a mess. I also recommend using a quality strawberry jam; the freshness truly elevates the taste of the cake. Decorate with fresh strawberries for an eye-catching finish, and you have a stunning birthday cake that's sure to impress!
Why You'll Love This Cake
- Delicious strawberry jam filling that adds a burst of flavor
- Light and fluffy cake that melts in your mouth
- Perfectly festive for birthdays or special occasions
Baking Tips for Optimal Texture
To achieve the perfect light and fluffy consistency for your Jellycat Birthday Cake, be sure to cream the butter and sugar thoroughly. This process introduces air into the mixture, which is critical for leavening the cake when baked. Aim for a pale, fluffy texture that nearly doubles in volume, which should take around 3-5 minutes of mixing. If you notice graininess rather than smoothness, you may need to mix a little longer before adding the eggs.
When incorporating the dry ingredients, it’s important to mix only until just combined. Overmixing can develop the gluten in the flour, leading to a denser cake than desired. Use a rubber spatula or a wooden spoon to gently fold the mixture, ensuring that no dry flour pockets remain, but avoid aggressive stirring. This simple technique ensures your cake retains that tender, soft crumb while still being stable enough to hold up the frosting and filling.
Filling and Frosting Insights
The strawberry jam filling not only adds a pop of sweetness but also enhances the overall moisture of the cake. When spreading the jam between layers, consider using an offset spatula for an even application, allowing for a balanced flavor in every bite. If you prefer a fresher flavor, you can substitute store-bought jam with homemade strawberry compote, which can be made by cooking fresh strawberries with a bit of sugar until they break down slightly.
For the frosting, ensure your butter is at room temperature before starting to mix. This is crucial for achieving a creamy, spreadable consistency without lumps. I recommend using a stand mixer fitted with a paddle attachment, as it provides thorough mixing, resulting in a smooth frosting that pipes beautifully. If the frosting feels too thick, add an extra tablespoon of milk, mixing until you achieve a spreadable texture perfect for frosting the cake.
Ingredients
Gather these ingredients to create your Jellycat Birthday Cake:
For the Cake
- 2 cups all-purpose flour
- 1 ½ cups granulated sugar
- ½ cup unsalted butter, softened
- 1 cup milk
- 3 large eggs
- 2 tsp baking powder
- 1 tsp vanilla extract
- ½ tsp salt
For the Filling
- 1 cup strawberry jam
- Fresh strawberries for decoration
For the Frosting
- 1 cup unsalted butter, softened
- 4 cups powdered sugar
- 2 tbsp milk
- 1 tsp vanilla extract
Once you have all the ingredients, you're ready to begin!
Instructions
Here’s how to make your Jellycat Birthday Cake:
Preheat the Oven
Preheat your oven to 350°F (175°C) and grease two round cake pans with butter or cooking spray.
Mix the Dry Ingredients
In a bowl, sift together the flour, baking powder, and salt.
Cream the Butter and Sugar
In a large mixing bowl, beat the softened butter and granulated sugar until light and fluffy.
Add Eggs and Vanilla
Add the eggs one at a time, mixing well after each addition, then stir in vanilla extract.
Combine Wet and Dry Ingredients
Gradually add the dry ingredients to the butter mixture, alternating with milk, and mix until just combined.
Bake the Cakes
Divide the batter evenly between the prepared cake pans and bake for 25 minutes or until a toothpick inserted comes out clean.
Cool the Cakes
Let the cakes cool in the pans for 10 minutes, then remove from pans and place on wire racks to cool completely.
Prepare the Frosting
In a mixing bowl, beat the softened butter and gradually add powdered sugar, milk, and vanilla extract until light and fluffy.
Layer the Cake
Once the cakes are completely cool, place one layer on a serving plate, spread the strawberry jam, then top with the second layer.
Frost the Cake
Frost the top and sides of the cake with the prepared frosting, and decorate with fresh strawberries.
Slice and serve your wonderful Jellycat Birthday Cake!

Pro Tips
- For the best flavor, use homemade or high-quality strawberry jam. You can also add a hint of lemon zest to the frosting for an extra zing.
Serving Suggestions
This Jellycat Birthday Cake shines as a centerpiece during celebrations. For added visual appeal, consider garnishing with thinly sliced fresh strawberries around the base of the cake and a dusting of powdered sugar on top just before serving. Not only does this enhance the presentation, but it also ties the flavors of the cake together beautifully.
To create a more whimsical presentation, you can use edible glitter or colorful sprinkles on top of the frosting to stay true to the playful vibe inspired by Jellycat toys. These fun decorations can make the cake more inviting for children and add a joyous spirit to your celebration.
Make-Ahead and Storage Tips
This cake can be made ahead of time, offering flexibility for party planning. You can bake the layers a day in advance. Once they are completely cool, wrap each layer tightly in plastic wrap and store them at room temperature. This prevents them from drying out while still allowing the flavors to deepen.
Assembled leftover cake should be stored in an airtight container in the refrigerator. The frosting helps to keep the cake moist, and it can stay fresh for up to three days. For longer storage, consider freezing individual slices wrapped in plastic wrap and then aluminum foil. Thaw them at room temperature when you’re ready to enjoy the cake again, ensuring it tastes as good as fresh.
Questions About Recipes
→ Can I use other types of jam?
Absolutely! Feel free to experiment with any fruit jam you prefer, but strawberry pairs wonderfully with vanilla cake.
→ How should I store leftover cake?
Store any leftovers in an airtight container in the refrigerator for up to 3 days.
→ Can I make this cake ahead of time?
Yes! You can bake the cake layers up to two days in advance and assemble it on the day of serving.
→ Is it possible to make this cake gluten-free?
Yes, you can substitute the all-purpose flour with a gluten-free flour blend, but make sure it contains xanthan gum.
Jellycat Birthday Cake with Strawberry Jam Filling
Created by: The Opheliaskitchen Team
Recipe Type: Home Bakery Recipes
Skill Level: Intermediate
Final Quantity: 10 slices
What You'll Need
For the Cake
- 2 cups all-purpose flour
- 1 ½ cups granulated sugar
- ½ cup unsalted butter, softened
- 1 cup milk
- 3 large eggs
- 2 tsp baking powder
- 1 tsp vanilla extract
- ½ tsp salt
For the Filling
- 1 cup strawberry jam
- Fresh strawberries for decoration
For the Frosting
- 1 cup unsalted butter, softened
- 4 cups powdered sugar
- 2 tbsp milk
- 1 tsp vanilla extract
How-To Steps
Preheat your oven to 350°F (175°C) and grease two round cake pans with butter or cooking spray.
In a bowl, sift together the flour, baking powder, and salt.
In a large mixing bowl, beat the softened butter and granulated sugar until light and fluffy.
Add the eggs one at a time, mixing well after each addition, then stir in vanilla extract.
Gradually add the dry ingredients to the butter mixture, alternating with milk, and mix until just combined.
Divide the batter evenly between the prepared cake pans and bake for 25 minutes or until a toothpick inserted comes out clean.
Let the cakes cool in the pans for 10 minutes, then remove from pans and place on wire racks to cool completely.
In a mixing bowl, beat the softened butter and gradually add powdered sugar, milk, and vanilla extract until light and fluffy.
Once the cakes are completely cool, place one layer on a serving plate, spread the strawberry jam, then top with the second layer.
Frost the top and sides of the cake with the prepared frosting, and decorate with fresh strawberries.
Extra Tips
- For the best flavor, use homemade or high-quality strawberry jam. You can also add a hint of lemon zest to the frosting for an extra zing.
Nutritional Breakdown (Per Serving)
- Calories: 360 kcal
- Total Fat: 18g
- Saturated Fat: 10g
- Cholesterol: 85mg
- Sodium: 210mg
- Total Carbohydrates: 48g
- Dietary Fiber: 1g
- Sugars: 30g
- Protein: 4g